As i wish
[Design pattern] Proxy pattern (프록시 패턴) 본문
안녕하세요. 오늘은 프록시 패턴에 대하여 알아보겠습니다.
프록시 패턴
어떤 객체에 대한 접근을 제어하기 위한 용도로 대리인이나 대변인에 해당하는 객체를 제공하는 패턴
간단합니다. 그런데 프록시 패턴에는 여러 가지 종류가 있는데요.
원격 프록시, 가상 프록시, 동적 프록시 등 여러 가지가 있는데요. 오늘은 크게 프록시 패턴에 대하여 정리해 보겠습니다.

이렇게 Proxy Class를 생성해서 RealSubject 가 아닌 Proxy 에 접근하여 RealSubject에 대한 접근은 제어하는 패턴이죠. 그 안에 원격 프록시, 가상 프록시 등이 속해 있는 거고요.
먼저 원격 프록시에 대하여 보겠습니다.

먼저 이런 식으로 구성되어 있고요. 클라이언트에서 request를 하게 되면 Proxy 가 받고 그 똑같은 request를 RealSubject로 보내 줍니다. 그 둘 사이엔 네트워크 통신 같은 것이 있겠죠? 그렇게서 돌아온 응답을 RealSubject는 Proxy에 주게 되고 그 Proxy는 클라이언트로 보내주게 됩니다. 그렇게 되면 네트워크 통신은 Proxy에서만 해주면 되고 RealSubject는 건드릴 필요가 없게 되는 거죠.
만약 이 패턴을 사용하지 않으면 RealSubject마다 네트워크 통신과 관련된 작업을 계속해서 해주어야 하죠.

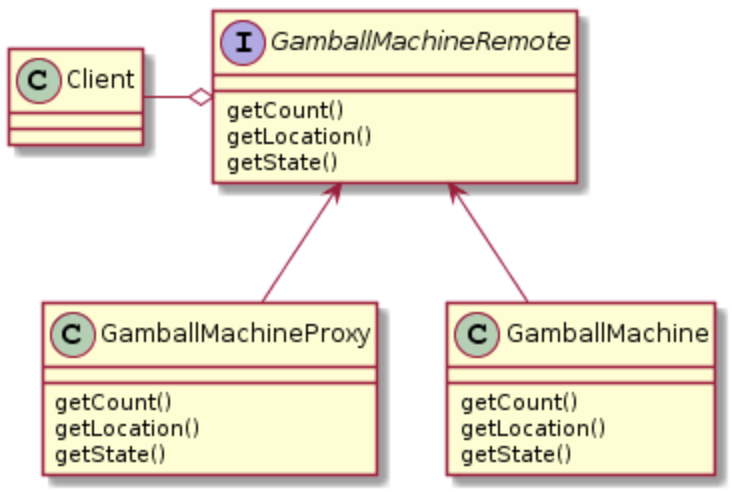
대략 이런 식의 UML Design이 그려질 수 있겠네요.
# -*- coding: utf-8 -*-
# Proxy Pattern

import abc

class GamballMachineRemote:
  __metaclass__ = abc.ABCMeta

  @abc.abstractmethod
  def getCount(self):
    pass

  @abc.abstractmethod
  def getLocation(self):
    pass

  @abc.abstractmethod
  def getState(self):
    pass

class GamaballMachineProxy(GamballMachineRemote):
  def __init__(self, realSubject):
    # For testing
    self.realSubject = realSubject

  def getCount(self):
    # Netwrok translate to RealSubject
    # Linked to GamballMachine
    #
    # For testing
    return ('Get count proxy %s' % self.realSubject.getCount())

  def getLocation(self):
    # Netwrok translate to RealSubject
    # Linked to GamballMachine
    #
    # For testing
    return ('Get location proxy %s' % self.realSubject.getLocation())

  def getState(self):
    # Netwrok translate to RealSubject
    # Linked to GamballMachine
    #
    # For testing
    return ('Get state proxy %s' % self.realSubject.getState())

class GamballMachine(GamballMachineRemote):
  def getCount(self):
    return 'GamballMachine count'

  def getLocation(self):
    return 'GamballMachine location'

  def getState(self):
    return 'GamballMachine state'

class Client():
  def __init__(self, machine):
    self.machine = machine

  def report(self):
    print self.machine.getCount()
    print self.machine.getLocation()
    print self.machine.getState()


proxy = GamaballMachineProxy(GamballMachine())

client = Client(proxy)
client.report()
이런 식으로 코드를 구성해 볼 수 있었는데요. 실제 네트워크 통신 부분은 주석 처리를 한 후 간단하게 구현했으니 참고만 해주세요.

두 번째로 앞서 언급했던 '가상 프록시' 에 대하여 가볍게 포스팅해보겠습니다.
앞에서 말한 프록시 패턴을 사용하는 데 사용법이 조금 다릅니다.

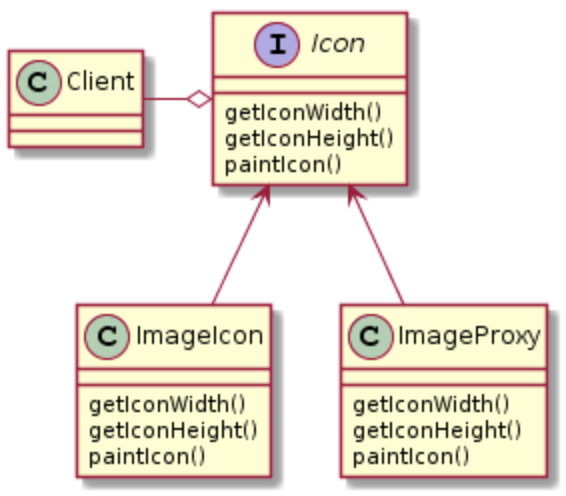
위처럼 RealSubject 가 생성될 때까지 Proxy 가 접근을 제어하는 방식인데요.

단지 차이점이 있다면 Proxy에서 RealSubject를 생성하고 생성하는 동안 접근을 제어한다는 것이죠.
# -*- coding: utf-8 -*-
# Proxy Pattern

import abc

class Icon:
  __metaclass__ = abc.ABCMeta

  @abc.abstractmethod
  def getIconWidth(self):
    pass

  @abc.abstractmethod
  def getIconHeight(self):
    pass

  @abc.abstractmethod
  def paintIcon(self):
    pass

class ImageIcon(Icon):
  def __init__(self, width, height):
    self.width = width
    self.height = height

  def getIconWidth(self):
    return self.width

  def getIconHeight(self):
    return self.height

  def paintIcon(self):
    print 'Paint icon !!!'

class ImageProxy(Icon):
  def __init__(self):
    self.imageIcon = None

  def getIconWidth(self):
    if self.imageIcon is None:
      print 'Default width'
    else:
      print ('Width %s' % self.imageIcon.getIconWidth())

  def getIconHeight(self):
    if self.imageIcon is None:
      print 'Default height'
    else:
      print ('Height %s' % self.imageIcon.getIconHeight())

  def paintIcon(self, width, height):
    if self.imageIcon is None:
      print 'Drawing Start'
      imageIcon = ImageIcon(width, height)
      self.imageIcon = imageIcon
    else:
      print 'Redrawing start'
      imageIcon = ImageIcon(width, height)
      self.imageIcon = imageIcon

imageIcon = ImageProxy()

print 'Before drawing'

imageIcon.getIconWidth()
imageIcon.getIconHeight()
imageIcon.paintIcon(10, 20)

print 'After drawing'

imageIcon.getIconWidth()
imageIcon.getIconHeight()
사실 그림을 그리는 동안 imageIcon.paintIcon(10, 20) 로딩이 있어야 하고 로딩 중에 getIconWidth() 또는 getIconHeight()를 부를 때는 여전히 Default width 나 Default height를 뿌려줘야 하지만 간소화 코드를 위해 생략했다는 점 염려해 주시기 바랍니다.

오늘은 큰 틀에서는 프록시 패턴 그 중에 원격, 가상 에 대하여 알아보았습니다.
데코레이터 패턴과 다른 점은
데코레이터 패턴은 '다른 객체를 감싸서 새로운 행동을 추가해 주는 것' 이지만
프록시 패턴은 '다른 객체의 접근을 제어' 한다는 점에서 다르다고 할 수 있습니다.
'Design Pattern' 카테고리의 다른 글
| [Design pattern] State pattern (스테이트 패턴, 상태 패턴) (0) | 2019.05.31 |
|---|---|
| [Design pattern] Composite pattern (컴포지트 패턴) (0) | 2019.05.23 |
| [Design pattern] Iterator pattern (이터레이터 패턴) (0) | 2019.05.13 |
| [Design pattern] Template method pattern (템플릿 메서드 패턴) (0) | 2019.05.05 |
| [Design pattern] 데코레이터 vs 어댑터 vs 퍼사드 패턴 (0) | 2019.04.22 |


