As i wish
[React 틱 택 토] Redux - React 프로젝트 사용 본문
안녕하세요. 엄티입니다.
이번에는 실질적으로 React-redux를 사용해 보겠습니다.
기존에 프로젝트에 각각 Redux 에 필요한 action, reducers, store 세팅은 지난 포스팅에 있기 때문에 참고해주세요.
[React 틱 택 토] Redux - React 프로젝트 세팅
안녕하세요. 엄티 입니다. 오늘도 역시 리액트 포스팅을 해보겠습니다. 저의 리액트 포스팅은 '제로초' 님의 웹게임 강좌를 바탕으로 포스팅 합니다. 제로초 님의 웹게임 강좌 리액트 무료 강좌(웹게임) - YouTube..
eomtttttt-develop.tistory.com
일단은 조금 더 큰 프로젝트에서는 Component 를 나눕니다.
UI 를 담당하는 Presentational Component와 로직을 담당하는 Container Component로 나눕니다.
그러나 이번에는 그냥 한번에 합치겠습니다.
Presentational Component and Container Component
https://blueshw.github.io/2017/06/26/presentaional-component-container-component/
blueshw.github.io
(React) Container와 Component
안녕하세요. 이번 시간에는 Container와 Component의 차이에 대해 알아보겠습니다. 지난 시간 Login 컴포넌트를 containers 폴더 안에 넣었습니다. Login 컴포넌트가 Container이기 때문입니다. Container도 react 패키지의 Co
www.zerocho.com
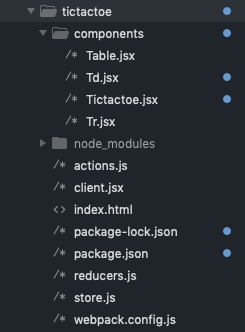
저는 총 4 개의 Component를 설계할 것인데요.
가장 큰 Tictactoe 그 다음 Table, Tr, Td 순으로 하겠습니다.
Tictactoe.jsx
import React, { Component } from 'react';
import { connect } from 'react-redux';

import * as action from '../actions';

import Table from './Table';

class TicTacToe extends Component {

  componentDidUpdate(prevProps, prevState) {
    // Can set from props in reducers state and action functions
    const { recentCell, tableData } = this.props;
    const { setWinner, resetGame, changeTurn } = this.props;

    const row = recentCell[0],
      column = recentCell[1];

    let win = false;

    if (row < 0) { // recentCell row index is -1, pass
      return;
    }

    if (tableData[row][0] !== '' && tableData[row][0] === tableData[row][1] && tableData[row][1] === tableData[row][2]) {
      win = true;
    }
    if (tableData[0][column] !== '' &&tableData[0][column] === tableData[1][column] && tableData[1][column] === tableData[2][column]) {
      win = true;
    }
    if (tableData[0][0] !== '' && tableData[0][0] === tableData[1][1] && tableData[1][1] === tableData[2][2]) {
      win = true;
    }
    if (tableData[0][2] !== '' && tableData[0][2] === tableData[1][1] && tableData[1][1] === tableData[2][0]) {
      win = true;
    } // Check 가로, 세로, 대각선

    if (win) {
      setWinner();
      resetGame(); // If has winner setWinner and resetGame
    } else {
      let all = true // if all is true, game is draw
      tableData.forEach((row) => {
        row.forEach((column) => {
          if (column === '') {
            all = false;
          }
        });
      });

      if (all) {
        resetGame(); // Set reset game
      } else {
        changeTurn(); // Change turn O -> X -> O...
      }
    }
  }

  render() {
    const { tableData, winner } = this.props;

    return (
      <>
        <Table tableData={tableData}/>
        {winner}
      </>
    );
  }
}

const mapStateToProps = (state) => ({
  tableData: state.tableData,
  recentCell: state.recentCell,
  winner: state.winner
}); // From reducers

const mapDispatchToProps = (dispatch) => ({
  setWinner: () => dispatch(action.setWinner()),
  resetGame: () => dispatch(action.resetGame()),
  changeTurn: () => dispatch(action.changeTurn()) // Use dispatch for call action function
}); // From reducers

export default connect(
  mapStateToProps,
  mapDispatchToProps
)(TicTacToe); // Connect for use Redux
이런식으로 Redux를 사용하기 위해 Component와 Reducers에서 정의한 state 들, actions 에서 정의한 함수들을 정의해주고 connect를 통해 연결 시켜 줍니다. 또한 actions에서 정의한 함수는 dispatch 를 통해서 부르면 엔진이 감지하여 reducers가 부른 함수를 듣게 되고 우리가 원하는 일을 하게 됩니다.
정리하면 redux를 사용하기 위해 connect 를 사용해서 state 와 함수를 연결 시켜 주고, actions 에서 정의한 action 함수들은 dispatch 를 통하여 불러줘야 반응 합니다.
그 후 Table 과 Tr 은 Redux 없이 진행합니다. 이처럼 Redux를 필요하지 않으면 사용을 안하면 됩니다. 일반 Component 처럼 사용 할 수도 있는거죠.
Table.jsx
import React, { PureComponent } from 'react';
import Tr from './Tr';

class Table extends PureComponent {

  render() {
    const { tableData } = this.props;
    return (
      <>
        <table>
          {
            Array(tableData.length).fill().map((tr, i) => {
              return <Tr key={i} rowIndex={i} rowData={tableData[i]}/>
            })
          }
        </table>
      </>
    );
  }
}

export default Table;
Tr.jsx
import React, { PureComponent } from 'react';
import Td from './Td';

class Tr extends PureComponent {

  render() {
    const { rowIndex, rowData } = this.props;

    return (
      <>
        <tr>
          {
            Array(rowData.length).fill().map((cd, i) => {
              return <Td key={i} rowIndex={rowIndex} columnIndex={i} columnData={rowData[i]}/>
            })
          }
        </tr>
      </>
    );
  }
}

export default Tr;
마지막으로 Td는 실질적인 click을 담당하기 때문에 Redux를 써서 전에 정의하였던 CLICK_CELL 를 불러줄것입니다.
Td.jsx
import React, { PureComponent } from 'react';
import { connect } from 'react-redux';

import * as action from '../actions';

class Td extends PureComponent {
  onClickCell = () => {
    const { rowIndex, columnIndex, turn, columnData } = this.props;
    const { clickCell } = this.props;

    if (columnData === '') {
      clickCell(rowIndex, columnIndex, turn);
    } else {
      alert ('Already set.');
    }
  }

  render() {
    const { columnData } = this.props;

    return (
      <>
        <td onClick={this.onClickCell}>{columnData}</td>
      </>
    );
  }
}

// ownProps is props from parent
const mapStateToProps = (state, ownProps) => ({
  tableData: state.tableData,
  turn: state.turn,
  rowIndex: ownProps.rowIndex,
  columnIndex: ownProps.columnIndex,
  columnData: ownProps.columnData
});

const mapDispatchToProps = (dispatch) => ({
  clickCell: (rowIndex, columnIndex, turn) => dispatch(action.clickCell(rowIndex, columnIndex, turn)),
});

export default connect(
  mapStateToProps,
  mapDispatchToProps
)(Td);
위 처럼 Redux 를 사용해야 하는 Component 는 connect 를 통해서 연결시켜주고 사용해야 합니다.
이렇게 되면 모든 준비가 끝났습니다.
index.html
<!DOCTYPE html>
<html lang="en">
  <head>
    <meta charset="utf-8" />
    <title>TicTacToe</title>
    <style>
        table {
            border-collapse: collapse;
        }
        td {
            border: 1px solid black;
            width: 40px;
            height: 40px;
            text-align: center;
        }
    </style>
  </head>
  <body>
    <div id="root"></div>
    <!-- 웹팩으로 빌드한 ./dist/app.js 파일 -->
    <!-- <script src="./dist/app.js"></script> -->

    <!-- webpack-dev-server 사용시 dist 폴더 사용 안함 -->
    <!-- but webpack.config.js 에서 publicPath 사용시 dist 폴더 사용 가능 -->
    <script src="./app.js"></script>
  </body>
</html>
기존 index.html 은 다른게 없죠.
이들이 잘 되는지 확인하기 위해서는 여러가지 방법들이 있는데요.
store.jsx 에서
const create = () => {
    return createStore(
      modules,
      compose(
        applyMiddleware(ReduxThunk),
        window.__REDUX_DEVTOOLS_EXTENSION__ && window.__REDUX_DEVTOOLS_EXTENSION__()
        )
      )
}
create 부분을 다음과 같이 바꿔 주면 크롬 확장팩을 통하여 확인 할 수 있고
조금 더 쉬운 방법은 reducers.jsx에 switch 문 상단에 로그를 찍어주면 됩니다.

'React JS' 카테고리의 다른 글
| [React SNS] React SNS 만들기 - 1 (0) | 2019.07.29 |
|---|---|
| [React JS] BookMark - 1 (0) | 2019.07.18 |
| [React 틱 택 토] Redux - React 프로젝트 세팅 (0) | 2019.07.18 |
| [React Lotto] useEffect, useMemo, useCallback (0) | 2019.07.11 |
| [React 가위, 바위, 보] 라이프 사이클 (0) | 2019.07.08 |


